
This guide covers the complete configuration of Exact Audio Copy (EAC) and then how to correctly rip a CD to FLAC. Once EAC is configured it will explain how to rip a CD and create a log file and cue sheet.
Firstly you will need to download the following:
2. FLAC (optional) – FLAC does come included with EAC but it is worth checking for a newer version.
Contents:
- EAC installation
- EAC Options
- Drive Options
- Compression Options
- Metadata Options
- How to rip a CD once EAC has been configured
Once you have these downloaded install Exact Audio Copy.

Select the following components during the install.
The reason not to select GD3 plugin is because after 10 uses you will have to pay for it.

Once the installation is complete launch EAC. A setup wizard will then appear. Click on cancel.

Now insert a popular CD into your drive.
A window like the one below should appear. If you have an older version of EAC or dBpoweramp installed it’s likely AccurateRip was already configured and the window may not appear.
You may need to try multiple CDs to get this to show up.
Click on “Configure“. It might take a minute or so but this is a very important step. You should try a few different CDs.

Once this has finished it is time to start setting up the other options.
Clicking “EAC” in the top left corner of Exact Audio Copy will show the following menu.

The next part of this guide will work through each section and explain how to configure EAC correctly.
Next we will configure the “EAC Options” from the EAC menu.
Start by clicking on “EAC Options” from the EAC menu in the top left corner.
The first tab is “Extraction“. Copy the settings as shown in the screenshot below.

NOTE: If you are using an older copy of EAC and there is an option “No use of null samples for CRC calculations” make sure this is UNCHECKED.
For the “Error recovery quality” setting here is a bit more detail:
When an error is detected after reading a frame EAC re-reads the frame 16 times in an attempt to get at least 8 identical results. The error recovery quality setting determines the maximum number of times EAC will do the 16 re-reads:
- Low = one batch of 16 re-reads
- Medium = up to three batches of 16 re-reads (16, 32, or 48, total)
- High = up to five batches of 16 re-reads (16, 32, 48, 64, or 80, total)
For each batch of 16 re-reads there is a row of red error correction lights in the extraction status window. If no batch of 16 re-reads produced 8 identical results, EAC considers whatever data it got to be “suspicious” rather than correct. EAC continues reading the entire batch of 16, even if it has already obtained 8 identical reads.
The next tab is “General“. Copy the settings as shown in the screenshot below.

The “Show status dialog after extraction” option setting can be problematic for some users. This displays the log after the rip is complete and offers the option to save the log file. If you follow this guide EAC will do this automatically. DON’T hit “Save Log”.
NOTE: The “Display times using frames” is suggested but NOT required. This option just affects how times are displayed in the main window. A track’s start or length will use the format H:MM:SS.##, where ## depends on how this option is set.
If you use frames, then the last two digits are an exact number of frames in a range of 00 to 74 because there are 75 frames per second. Otherwise the last two digits are an approximate number of hundredths of seconds in a range of 00 to 99. Time information in frames is generally more native to CDs. The display of hundredths of seconds is likely to be rounded and not really exact. Therefore it’s recommended to enable this setting so that the times are displayed in frames.
The next tab is “Tools“. Copy the settings as shown in the screenshot below.

If your drive is capable of reading UPC/ISRC codes and CD-Text (you can figure this out by trial and error) you can keep the top two options checked.
NOTE: If you wan’t to create a .m3u playlist files then check the “Create ‘.m3u’ playlist on extraction“. This is up to you and totally optional.
The next tab is “Normalize“. Copy the settings as shown in the screenshot below.
We are making a lossless backup so make sure normalize is UNCHECKED.

The next tab is “Filename“. Copy the settings as shown in the screenshot below.

The “Naming scheme” should be set to:
%tracknr2% - %title%If you prefer periods “.” instead of dashes in the filenames then you can use:
%tracknr2%. %title%If you need track numbers to go into triple digits use %tracknr3% instead.
Check the box “Use various artist naming scheme” and use:
%tracknr2% - %artist% - %title%NOTE: Don’t use a directory structure in your EAC filename options, unless you want to go back and edit your cue sheet later. When you add a directory to the naming scheme it will put that directory path into the files. If at a later date when you may have moved the files and you want to burn the files in EAC using your cue sheet you will be unable to do so. If you do insist on using a directory structure here you need to go back and edit the cue sheet in a program such as notepad and remove the folder name from each line.
For example, a cue sheet line should look like this:
FILE "01 I Saw Her Standing There.wav" WAVE
Not like this:
FILE "C:\CD Rips\The Beatles - Please Please Me\01 I Saw Her Standing There.wav" WAVE
These are all the settings to setup for this section. Any tabs not pictured are completely optional settings or are irrelevant to ripping.
Next we will configure the “Drive Options” from the EAC menu.
Start by clicking on “Drive Options” from the EAC menu in the top left corner.
The first tab is “Extraction Method“. Copy the settings as shown in the screenshot below.

Start by clicking “Detect Read Features…” This can take a few minutes. The only feature detection that actually matters is “Accurate Stream”.
If your drive can use it select this setting (most modern drives have Accurate Stream). If it can’t, don’t.
Even if your drive doesn’t cache audio leave it checked. It doesn’t affect the audio quality at all.
Do not use C2 even if EAC thinks you can. Most drives have terrible C2 error implementation.
The next tab is “Drive“. Copy the settings as shown in the screenshot below.

Click “Autodetect read command now“. It shouldn’t take long.
Leave everything else unchecked unless you’re having problems. You can check “CD-Text Read capable drive” if you want.
NOTE: If you have an older drive you might need to tick “Spin up drive before extraction”. Only select this if your drive has difficulty reading data on spin-up.
The next tab is “Offset / Speed“. Copy the settings as shown in the screenshot below.

If you completed the AccurateRip configuration at the start of this guide the top half here will be greyed out. If not you will need to find your read offset correction from this list.
Don’t use a combined read/write offset. AccurateRip is a very useful function for checking that your rips are OK. You should go back and try to get it configured if this option isn’t greyed out.
If you want to figure out whether your drive needs “Overread into Lead-in and Lead-Out” ticked you can temporarily uncheck “Use AccurateRip with this drive“. Put a CD in the drive and click “Detect read sample offset correction…“
Once EAC has finished analysing it will show a window the same as below:

Remember to check “Use AccurateRip with this drive” once you have finished testing.
The next tab is “Gap Detection“. Copy the settings as shown in the screenshot below.

Most drives should work with the settings shown above. If the drive stalls on detecting gaps or detects gaps that are obviously wrong (like 30 second gaps on a non-live album) then try detection method B or C. If A, B, and C all fail, you can switch “Secure” to “Accurate” and try again.
These are all the settings for this section. Any tabs not pictured are completely optional settings or are irrelevant to ripping.
Next we will configure the “Compression Options” from the EAC menu.
Start by clicking on “Compression Options” from the EAC menu in the top left corner.
The first tab to check is “External Compression“. Copy the settings as shown in the screenshot below.

Check “Use external program for compression” and then pick “User Defined Encoder“. Then enter “.flac” into the file extension box.
Browse to the location where FLAC.exe is saved. Usually it can be found here:
C:\Program Files (x86)\Exact Audio Copy\FLAC\flac.exeIn the “Additional command-line options” enter the following:
-8 -V -T "ARTIST=%artist%" -T "TITLE=%title%" -T "ALBUM=%albumtitle%" -T "DATE=%year%" -T "TRACKNUMBER=%tracknr%" -T "GENRE=%genre%" -T "PERFORMER=%albuminterpret%" -T "COMPOSER=%composer%" %haslyrics%--tag-from-file=LYRICS="%lyricsfile%"%haslyrics% -T "ALBUMARTIST=%albumartist%" -T "DISCNUMBER=%cdnumber%" -T "TOTALDISCS=%totalcds%" -T "TOTALTRACKS=%numtracks%" -T "COMMENT=%comment%" %source% -o %dest%The “Bit rate” and “High / Low quality” options have no effect on the rip so don’t worry about these.
NOTE: When ripping to FLAC format do not tick the “Add ID3 tag” box. This is because FLAC uses a different tagging system to MP3. By following this guide the files will be correctly tagged using FLAC tags / Vorbis comments.
The next tab is “ID3 Tag“. Copy the settings as shown in the screenshot below.

Leave everything unchecked apart from the last option.
These are all the settings for this section. Any tabs not pictured are completely optional settings or are irrelevant to ripping.
Next we will configure the “Metadata Options” from the EAC menu.
Start by clicking on “Metadata Options” from the EAC menu in the top left corner.
The first tab to check is “Metadata Provider“. Copy the settings as shown in the screenshot below.

This is where you pick the metadata provider. If you did install GD3 it will be in the list. You can only rip 10 discs before you have to pay for a subscription though. Otherwise you have a choice between the CUETools DB plugin, freedb plugin and EAC’s native freedb support.
The CUETools DB plugin is recommended due to its use of multiple databases in its metadata queries (Discogs, Musicbrainz and freedb). If selected, be sure to click “show options” and select “Extensive” under Metadata search mode and “Large” for covers search mode.
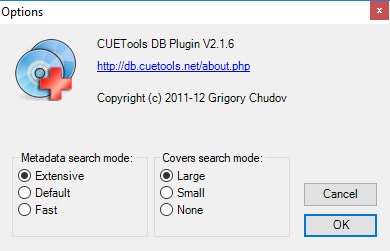
If you choose to use EAC native freedb support you will need to enter the following settings under the “freedb” tab as shown below.

Make sure you put an email at the top but it doesn’t need to be real. Click “Get active freedb server list“. Then tick the last option.
That’s it! Configuration is complete. Once you close down EAC all the settings will be saved. It’s a good idea to go back through all the options and just double check everything is set correctly.
Now you have EAC setup you can start to rip CDs to your computer. Next we will walk through the options needed prior to ripping. It covers gap detection and creating a .cue sheet.
The next part of this guide explains how to rip a CD once EAC has been configured as above.
Open up EAC and insert a CD. It should connect up to your chosen metadata provider (selected in the options) and grab all the CD information and look something like the screenshot below.

Check everything is named correctly here as these will be the tags for the finished files.
Next check that “Append Gaps to Previous Track (default)” is selected. This can be found under the “Action” menu.
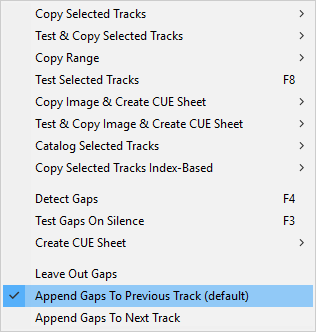
Now press F4 or click on “Action” and then click “Detect Gaps“. This step is very important and should not be missed.

EAC will then start to detect the gaps and a window like the one below will appear.
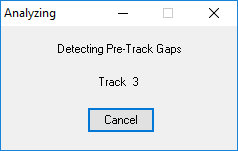
Once it has finished the gaps will then be shown in the main EAC screen. As shown below.

Next click on “Action” and select “Create CUE Sheet” and choose “Multiple WAV Files With Gaps… (Noncompliant)“.

A window will then popup asking where you want to save the .cue file. Select a folder of your choice. For example: C:\EAC Rips
Now it is time to begin ripping!
Click on “Action” and then choose “Test & Copy Selected Tracks” and choose “Compressed…“
NOTE: If you want to rip the CD to .wav format you can select “Uncompressed” here.

EAC will start to rip the tracks. The “Extracting Audio Data” box will popup and show the progress of the ripping.
This could take anywhere from 5 minutes to 5 hours! It depends on the drive you are using and the condition of the CD.

Once EAC has finished you will see “Audio Extraction Complete” appear at the bottom of the window.

Click OK and it will return to the main EAC window and ripping is complete.